Ever since its launch in November 2004, Google Scholar has become an indispensable search tool amongst students, researchers, and legal practitioners around the globe. Be it for working on their thesis, searching for fellow researchers and their work, or searching for prior art or any other law-related search, it has become the pervasive tool, the search community simply can’t fathom not exploring. As we provide patent search services, so, we also have had a fair chance of using this amazing tool in various prior art searches, especially for non-patent literature.
However, if you are new to it, getting the most out of it is difficult, if you don’t know your way around the tool. For that very reason, we decided to create the ultimate Google Scholar guide that answers all your Scholar-related questions. In this article, we will also briefly explore how Google Scholar can empower your scholarly as well as legal searches.
You can downloaded this long article as a pdf by filling out the form below:
CMO’s Note: Though this article is slightly focused on patent attortneys, we are confident that all the advice/tips covered in this guide are applicable to anyone who wants to use Google Scholar in their work.
Why Google Scholar?
Let’s take the example of patent attorneys. Finding non-patent literature (NPL) relevant to any case is a big part of their job. Tumbling through the sheer range of databases, repositories, directories, file types, and formats that exist can be exhaustive.
Now, finding scholarly work is not easy when you don’t know where to begin your search with. As we mentioned above, a number of databases and repositories of research information and articles are too much to go through one by one. Google Scholar brings all of such scholarly work to a single place, thus making the entire process easier. Not just patent attorneys, this applies to almost everybody, from students to professors and researchers.
Attorneys need to be equipped with all kinds of tools at their disposal to advise clients, present their case in the right light in front of a judge, jury, or the opposing counsel. Moreover, for patent attorneys, the research is more focused because one does not need to just understand patents, but also scrounge for all the non-patent literature relevant to the case.
This is exactly where Google Scholar comes to aid. Whether you’re an experienced IP professional or a newbie who is just getting started in the field, Google Scholar is your go-to tool that could help find relevant non-patent literature real easily.
PS: If you are in a hurry and would like to get to the meat of the material, you could skip to the next section using the table of contents below.
What is Google Scholar?
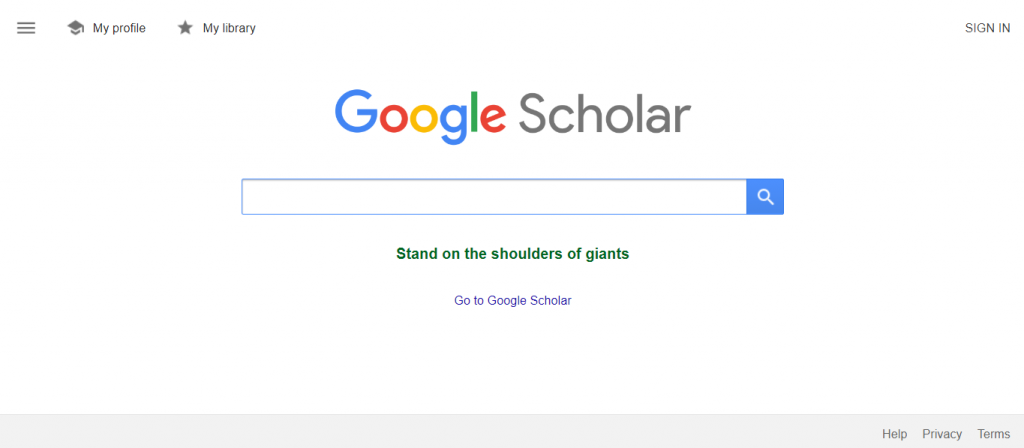
Google Scholar is a free online research library that aggregates all scholastic literature online into one search engine, powered by Google, located at scholar.google.com.
Its vast range of scholastic sources includes academic publications, colleges, universities, research institutions, journals, conference papers, theses, dissertations, and other online repositories. It is suitable for academic, technical, and legal research purposes (for Ph.D. thesis, research reports, term papers, court documents, etc.). It also combines the ability of Google Patents Search and gives patent literature in results. It is similar and often complementary to online research tools like Scopus and arXiv.org.
University online libraries are designed for academic research among documents within that single university’s records. Similarly, the scope of any other literature database is often confined to its own data. Google Scholar is similar to that, except its search database includes relevant files from all universities and all other online sources of scholastic information.
What is the difference between Google Scholar and Google?
“Focused” is the word. While Google is a generic web search engine, Google Scholar is meant for scholastic search purposes only. A search for “contract law” gives us roughly 37 million search results on Google.

The same search on Google Scholar gives us a little over 2.4 million results.

So, we can clearly see that Google Scholar is much more focused than Google’s primary search engine itself.
Further, there is a clear difference of purpose between Google Web Search and Google Scholar. If you want to search for articles/news/images/videos (among other things) on the internet, you use the standard version of Google. To search scholarly databases for research purposes, we will use the scholarly version of Google i.e. scholar.google.com.
You can use both because they are complementary sources; chances are you may stumble upon a blog in a Google search that will link to a study and will simplify its conclusions for you. But experts agree, if you are clear about the motive of your research, Google Scholar is the hub you ought to go to for efficient searches, instead of Generic google and other Scholastic search engines.
Google Scholar Metrics – Measure your Research Output
A lot of features differentiate Google Scholar from other similar scholastic search engines. Firstly, it measures the research output by the number of citations, and other citation-based metrics like h-index, and i10 index.
As we will see later in this article, you can create your own Google Scholar profile where you can set up Scholar to track literary citations in your name. Thus, you can keep track of who cites your work and how well ranked your work is.
How to use Google Scholar?
To learn how to use Google Scholar, we will take the help of an example. We will start with the basic search options of Google Scholar, then move on to the advanced search and search wildcards for filtering. To make it easier to manage our searched links, we will see how to create a library of saved links and organize it with labels (just like Gmail). This will help us in future search sessions.
Google Scholar also makes it easy even if you don’t know any referencing style; it creates ready-made references for papers/articles/documents we want to cite. Not just that, because of Scholar’s integration with other referencing systems, you can simply import references in the format accepted by any of the 4 referencing systems: BibTex, RefWorks, RefMan, and EndNote.
How to Access Google Scholar in a Browser?
Accessing Google Scholar is as simple as accessing any other website:
To get started,
- Visit scholar.google.com. By default, it will redirect to your country’s local domain. (For example, if you’re browsing from India, you’ll be redirected to Scholar.google.co.in) This may restrict the area of search to only national sources. For effective search, this is not desirable and must be changed.
- If you are on any local domain of Scholar, click on “Go to Google Scholar” below the main search box on the screen. (Sometimes, this option is not available depending on your location. To solve this problem, you can use a VPN or a proxy software to mask your location)
- Verify that you are on “scholar.google.com” by looking at the URL in the address bar.
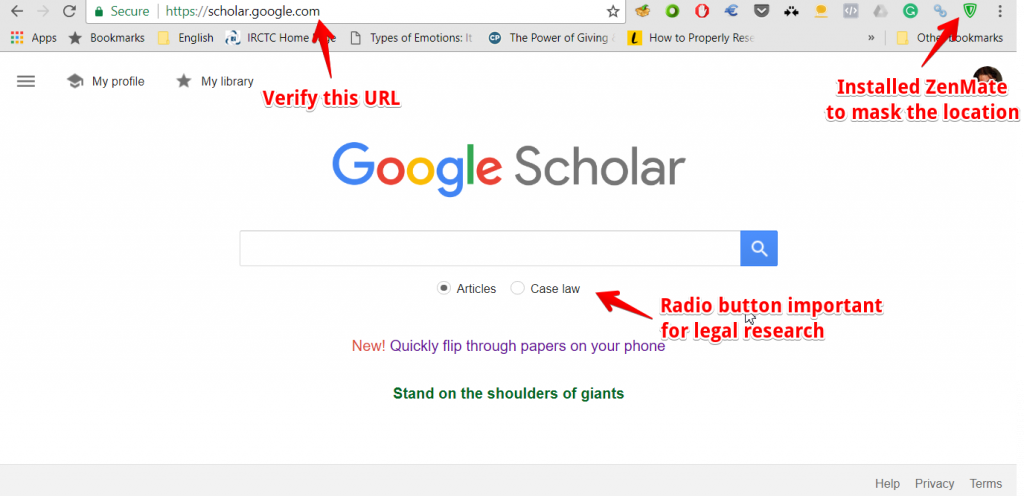
Now, we are ready to search.
Using the Search result options
Let’s start our search with the keyword “Contract law”.
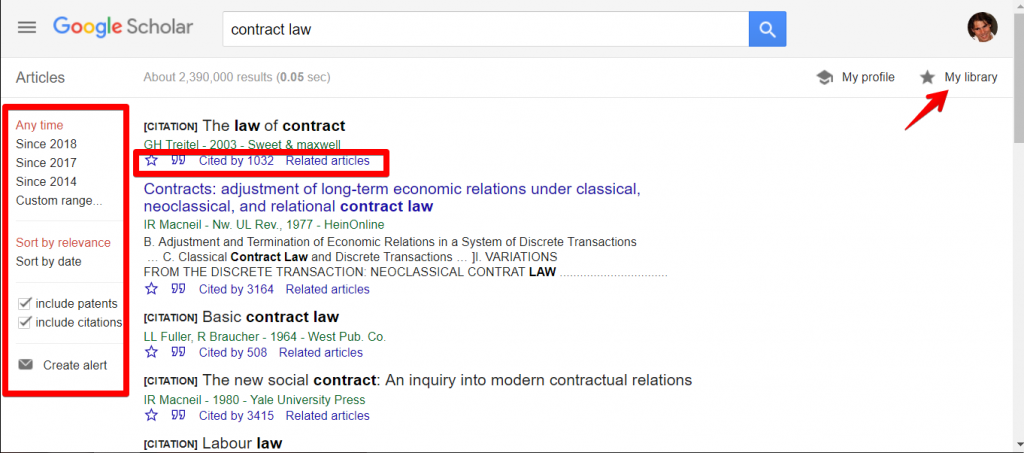
Each search result comes with four options:
- Clicking on the star will save the article to your library. We will see later in this article how to manage this library. If an article is already saved to your library, this star will be marked.
- Clicking the quotes (cite) option will open up a mini-dialog window with references pre-constructed in different styles, as shown in the image below. This is a very useful window, as it also allows you to import the article into different referencing management systems and also gives you readymade references in different referencing styles.

- The “Cited by” count is the number of citations the article has received that have been tracked by Google Scholar. In the Scholar profile section, we will also see how to make Scholar track citations to your work automatically later.
- Clicking on “Related articles” will search for articles similar to the current one.
Search Options on the left bar

In the search bar on the left side, you can find various options, which would enable you to –
- Restrict search to a specific time period by selecting the year or defining a custom time period.
- Change the sorting order to see the latest articles or the most cited articles (relevance is based on the number of citations).
- Choose to include/exclude patents or articles with citations of the original articles
- Set up alerts that send any latest search articles directly to your email. It is used to keep track of the new articles which are published online.
Using the Google Scholar Library feature
Another very useful feature of Google Scholar is the ability to save articles to your library, by clicking the “star” button in search results. You can search while traveling to work and save them to the library to view them later.
When you are done with reading the saved articles or when they are no longer relevant to you, simply delete them from the library.
To manage the articles saved in your Google Scholar library:
- Click “My Library” in the top-right corner to open the library. We had saved some articles from the previous search, as you can see in the image above. You can directly click on these articles to access them.
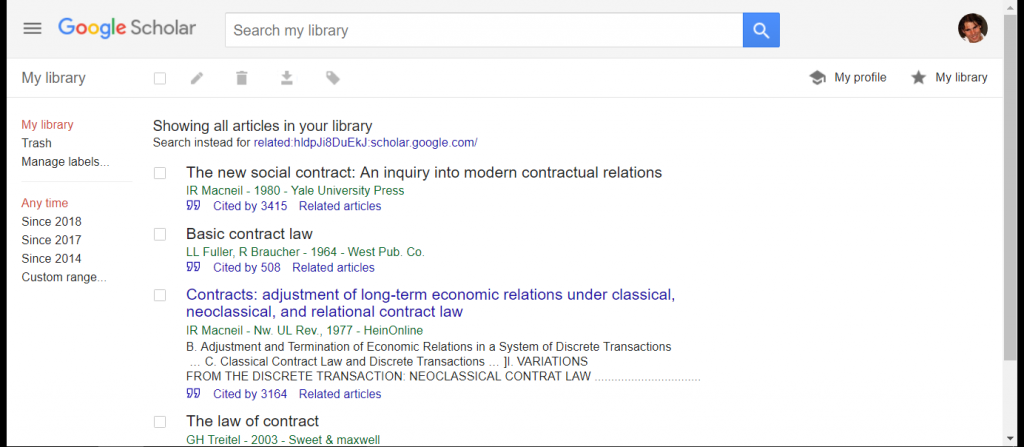
To select an article in the library, click the checkbox on its left.
To delete a selected article from the library, click the trash icon from the toolbar on the top. Deleted articles are assigned the label “Trash”. Their deletion can be undone as long as they’re in Trash and not permanently deleted.
To organize and categorize the articles in the library:
- Select an article by clicking the checkbox on its left.
- Click on the “Labels” icon on the top toolbar on the top. A drop-down opens as shown below.

- Click “Create New” to open the “New Label” dialog box.
- Enter your new label in the text box and click “Create”.

The newly created label is applied to the selected article. You can assign multiple labels to categorize an article.
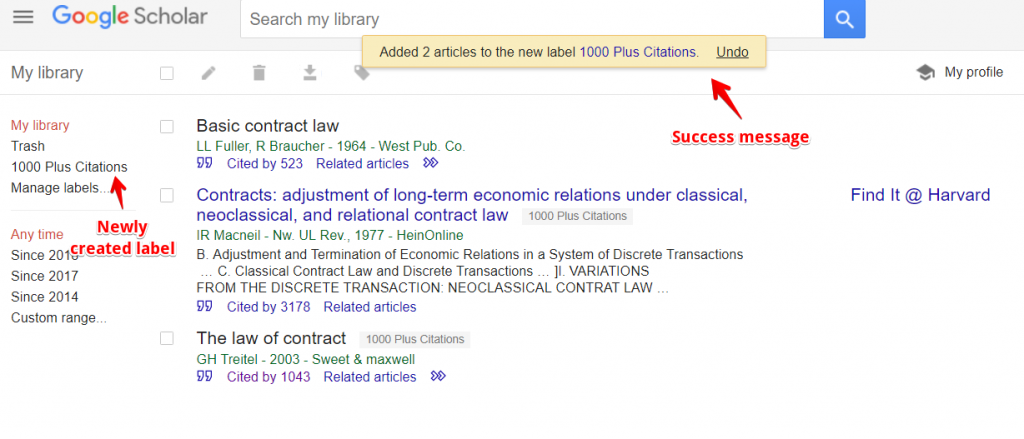
All the labels you create will be visible in the left sidebar.
Clicking on the label will show articles belonging to only the single category.

- To remove labels, click the “Manage Labels” link from the left sidebar again and this time you will see a list of all the labels you have created.

- Click the “X” mark next to the unwanted label and click “Delete” to finish deleting that label. You will see the same screen refreshed and update without the label you just deleted.
- Click the “Back” arrow on the top-left corner to go back to the screen you were working on.
Expanding Search Horizon with Google Scholar
It is difficult (often impossible) to get the ideal result of a search on the first page on the first try. It may take several searches to get what you want.
We have described several ways to search better in this section. Many techniques are similar to generic Google search; we have tried to add more Scholar-specific techniques as well.
Related and Citing articles
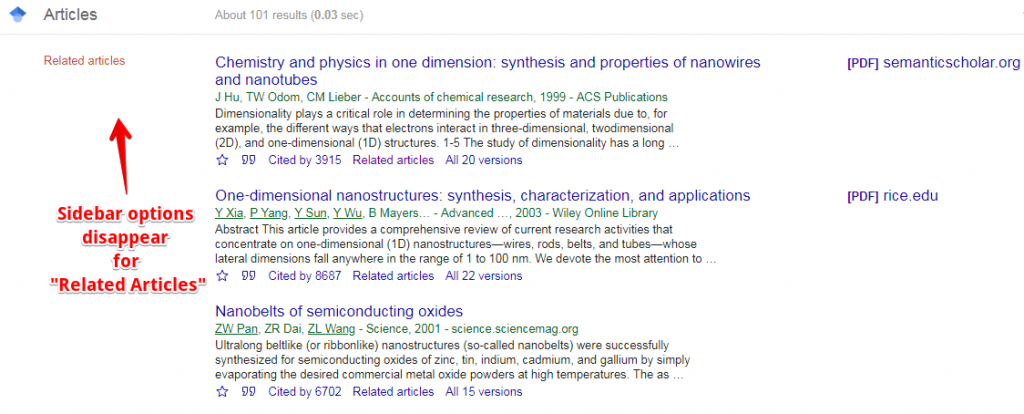
Each search result in Google Scholar has a “Related articles” link below it. When you click it, Scholar searches its database for articles similar to the selected one.

Fair warning: the filtration options in the left sidebar will disappear when you search for related articles.
Similarly, “Cited by” shows the number of citations a particular scholastic publication has received. Clicking on this count opens all the citing articles of the original article.
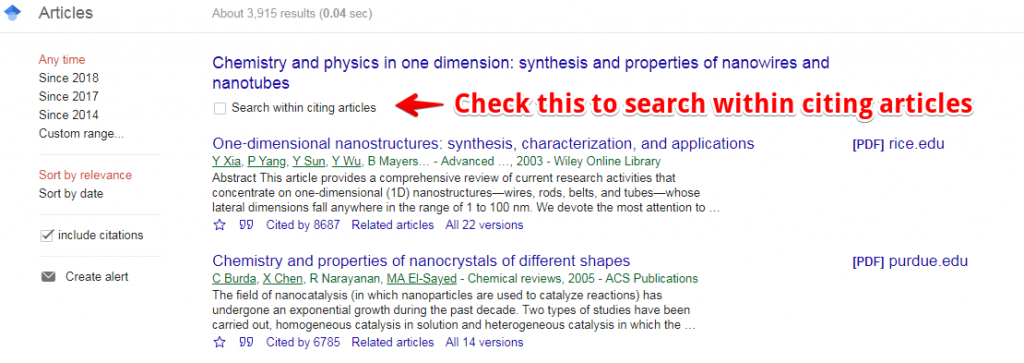
In the image above, you will see a checkbox saying “Search within citing articles” which provides a good way to refine the search to scholarly documents that have cited the original article. Usually, publications refer to the more general source and draw specific conclusions, so you will be moving your research in a more generic direction.
While citation numbers may seem like the popular convention to gauge the usefulness of the article, researchers are advised to not rely on citation count as the only indicator of the usefulness of the article. Authors have ways to drum up the citation numbers and citation count given in Google Scholar may not always be very reliable.
Both these options (“Related articles” and “Cited by”) are used to narrow your search in a particular direction.
Search Switches and Date filtering
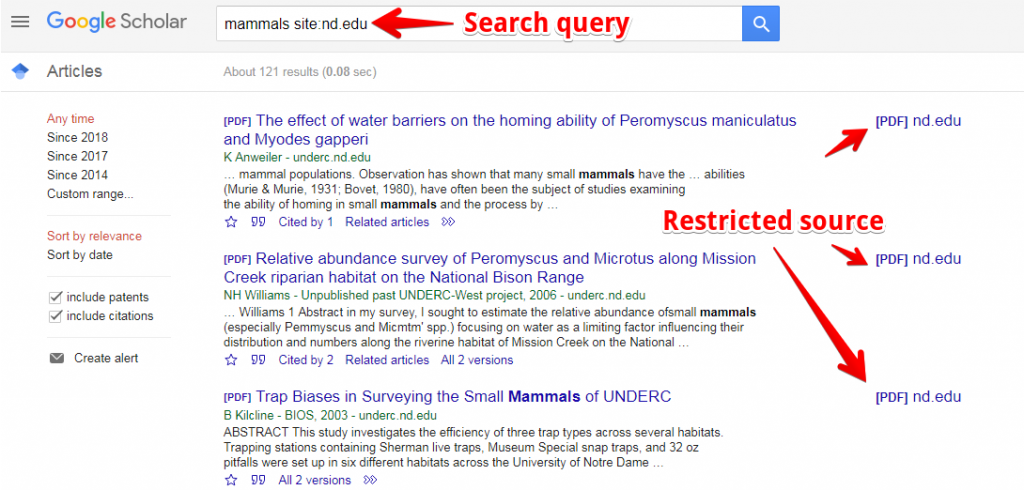
One of the most underrated and underused search tricks in Google Scholar are search switches, more commonly known as “search operators”. These keywords followed by the “:” are used to narrow down the search.
- “site:” filter – This will restrict the search only to a specific site. This operator can be used at the end of the keyword. For example, the keyword “mammals site:nd.edu” will search for the scholastic articles and documents only within the University of Notre Dame website (nd.edu). Use this to restrict searching only within one specific university.
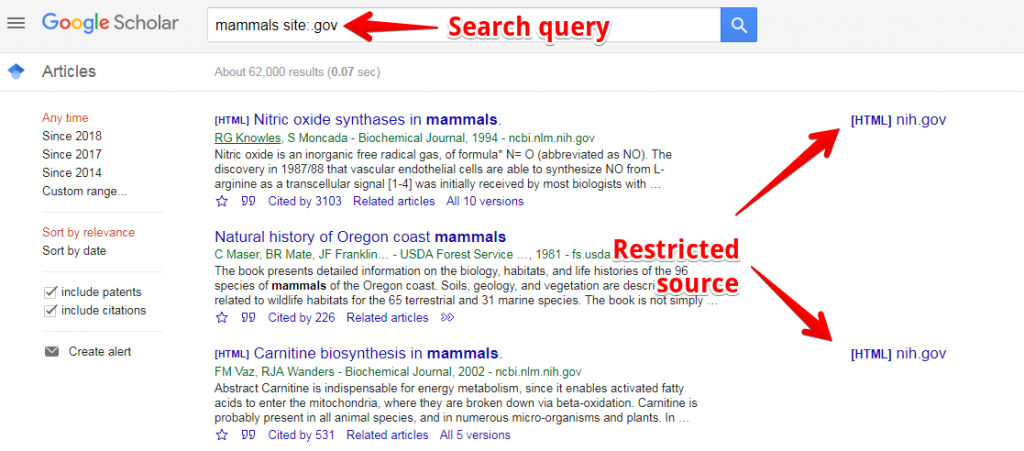
Another example – “mammals site:.gov” will look for studies and papers about mammals published/hosted on US government websites.
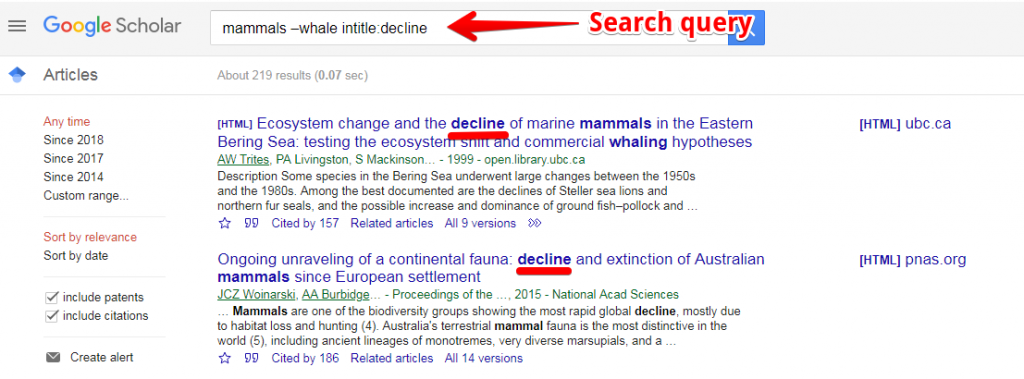
- “intitle:” filter – This will ask Google Scholar to search for titles containing specific keywords. For example, “mammals –whale intitle: decline” – this key phrase will search for all studies on mammals whose population is declining, it will also exclude any searches for Whale.
- “author:” filter – This will ask Google to search for scholastic publications of your favorite author or researcher. For example, contract law author: “SJ Burton” searches for all publications on Contract Law solely authored by SJ Burton.

Google Scholar Advanced Search
When you are searching for an article, most of the times you start with a rough idea of the keywords. It may take several revisions of your search keyword to get your desired scholastic publication on top in search results.
If you want the maximum possible search radius, you can use Google Scholar’s “Advanced Search”. It is a handy tool to perform the precise search at a much granular level. Here’s how the Advanced Search form looks like:

Most of the fields are quite self-explanatory. Let’s see how the fields can be better used for a fine-grained search experience.
- with all of the words – To search for an entire search keyword phrase in the article. Google will return the result if all the words in the search keyword phrase are found in the article, regardless of their order of appearance.
- with the exact phrase – This one is similar to the previous one, except Google qualifies the search result only if the all the words in the search keyword phrase are found in the article IN THE EXACT ORDER OF APPEARANCE
- with at least one of the words – Use this option when you are not sure if all of the words in the search keyword phrase will be found in the article.
- without the words – To list all the words that should be excluded from your search. If the article in search results contains these words, the article will be omitted from the search results.
- where my words occur – To select where Google should search for your keyword phrase
In the next three fields, you specify if you want to search papers/publications from a specific author, or published in a specific journal or publication, or provide a range of years to limit your search to.
Shortcuts for better search on Google Scholar
- Double quotes – For Google, any keyword or phrase surrounded by double (or direct speech) quotes means it will look for an article with the exact match of keywords within the quotes – all words in the phrase following the same order. So, if you already know the exact title you want, feel free to search the name by enclosing it within quotes. Doing so will eliminate all the other close searches that may be relevant to you but not an exact match.

While this wildcard filters out the irrelevant matches, you need to be absolutely sure before using double quotes for a focused search.
- Use minus (-) sign as exclusion filter – Each search term may have different areas of research. To run a focused search in a specific direction, you would want to exclude other terms. For example, a simple search for “Contract law” gives me a broad set of results (close to 2.4 million)

But if my search term is “Contract law -social” it filters out all articles with the word “social” in the title and I will get a much more focused set of articles (1.8 million)

- Use the asterisk (*) sign as an approximation filter – If you want to include all possible combinations of a word or a phrase, simply add the “*” sign at the end of it. For example, Google will assume “wearable *” as “titles containing all phrase combinations that start with the word ‘wearable’”. The searcher here wants to search the scholastic literature for all types of wearable tech, not limiting the search to a specific wearable garment.

- Use the “OR” operator to search in two probable paths – Suppose you are searching for “Contract Law”. If the search results are not satisfactory by expanding your search perimeter to include Contract theory. The search query would then be – “Contract Law” or “Contract Theory”. Google then searches for titles matching (or similar to) both keywords – before and after the “or”.

Note: The use of “OR” operator is case-insensitive.
Similarly, by using the “AND” operator, you will ask Google to necessarily search for only those titles that have both the phrases, ignoring their order of appearance.

- Search for time-bound studies – To target only those studies that happened in a specific year, just use “..” symbol (two dots without space) followed the year under consideration. For example, Rio Olympics took place in 2016. So if I want to target all studies in the sport of shooting in 2016, I will use the keyword – shooting ..2016

Searching documents from a specific University source using Library Links in Google Scholar
Sometimes Google Scholar’s global library may be too broad of a search space. It may so happen that students actually just want to search only within their college libraries. Fortunately, Google Scholar allows you to obtain the full text of a publication from your preferred university through its “Library Links” feature.
To use the “Library Links” in Google Scholar,
- Click the menu (three lines) icon on the top-left side of the screen after logging into Google Scholar
- Click the “gear” icon on the menu to open the “Settings” page.

- Click “Library Links” from the left sidebar.

- Type your preferred university name and press Enter to search.
- From the options presented, select the preferred library and click “Save”. You can select a total of 5 such libraries in Google Scholar.

To search for full text from your selected universities, perform a search as usual in Google Scholar. If any search result has its full text on the servers of the universities you selected in the previous step, they will be marked accordingly.
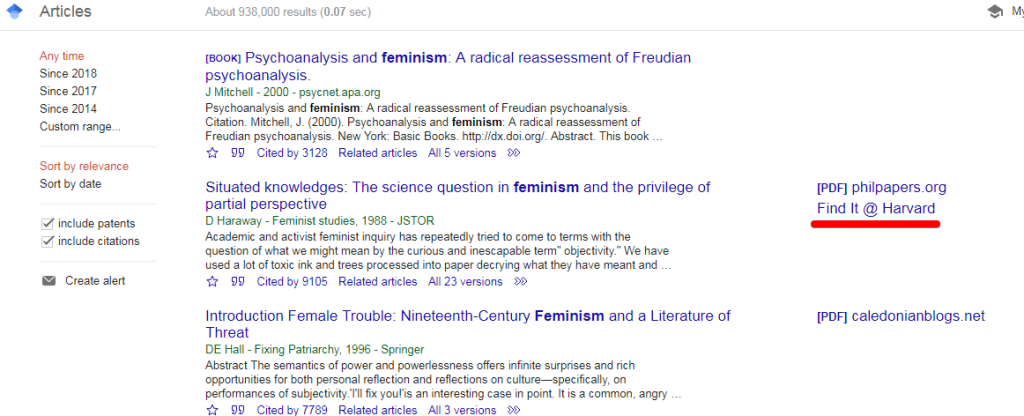
Click on the “Find It” link and you will be taken to University portal’s login page. Access the full text you desired by logging into the portal with your correct login information.
Note that adding universities this way will ensure the inclusion of these universities in search results, but it won’t exclude other universities.
Using the Google Scholar Exporting Option
Google Scholar allows you to export references for all publications into 4 most used reference management tools:
- EndNote
- BibTex
- RefMan
- RefWorks
To import your references into reference management software from Google Scholar,
- Search for your keyword in Google Scholar.

- Choose a document to cite, and click the doubles quotes button. The below screen pops out.

- Click on any of your preferred formats from this screen and follow the instruction on screen.
- For BibTex, you will get a piece of code in your browser that you will have to copy and save in BibText.
- For EndNote, you will download a .enw file and for RefMan, you will get a RIS file. Just save and open these files in the respective reference management tool to include it in your reference library.
- For RefWorks, the imported references will be sent to your RefWorks account. So, you will have to log in to your RefWorks account first, if not already logged in.
Keeping tabs on studies of a particular topic using Google Scholar
Often researchers and attorneys specializing in a specific area have to stay updated on all the latest studies and publications in the field. This is where email alerts from Google Scholar come in very handy!
Just like Google’s own search alerts, you can also set up email alerts for specific keywords on Google Scholar. It will then send you the latest publication right to your email immediately as Scholar finds them, thus saving you the time and effort required to keep track of new journals/papers/studies in your research field.
To set up Google Scholar Alerts,
- Perform a search in Google Scholar.
- From the left sidebar, click the “Create Alert” button.

- On the next screen, verify your email and the search keyword and click “Create Alert” button.

You will start receiving emails as soon as new publications are indexed on Google Scholar for the search keyword you just chose.
Google Scholar Citations
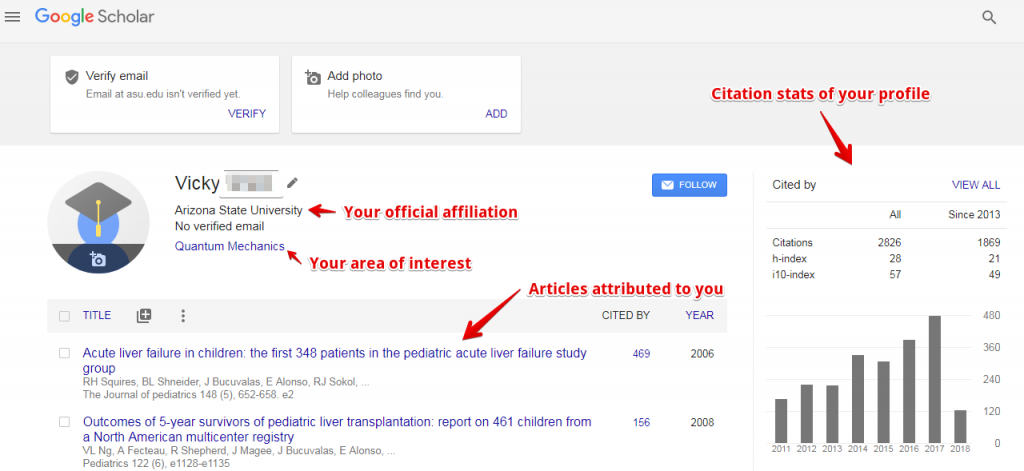
Since Google Scholar is fast becoming the tool of choice for researchers to publish and find new studies, it makes sense to set up your Google Scholar profile. A properly set up profile will help Scholar automatically track the attributions and citations for your publications.
With the help of automated citations, Google Scholar helps researchers perform several citation-related operations automatically. With a Scholar profile, you can
- Track who is citing your articles online,
- Check which articles are citing your work,
- Analyze citations over a period of time with the help of simple graphs
- Check the quality of other researchers’ work with the help of automatically computed citation metrics like h-index. You can also use it to better track your own work as well
An obvious advantage of setting up a Google Scholar profile is that it becomes the tool to build your influence as a researcher. All this without having to manually track the citations for your work, isn’t that cool?
To let Google Scholar track your publications and citations,
- Click the Menu button (three lines) in the top-left corner after logging into Google Scholar
- Click “My Profile”.

- On this screen, add your details accurately. You can also add URL to your website or your university profile.

- For verification email, Google asks for a professional email on an educational institute’s mail server.
- Click “Next”
- Now Google Scholar presents a list of articles organized in groups that it finds with credentials similar to yours.
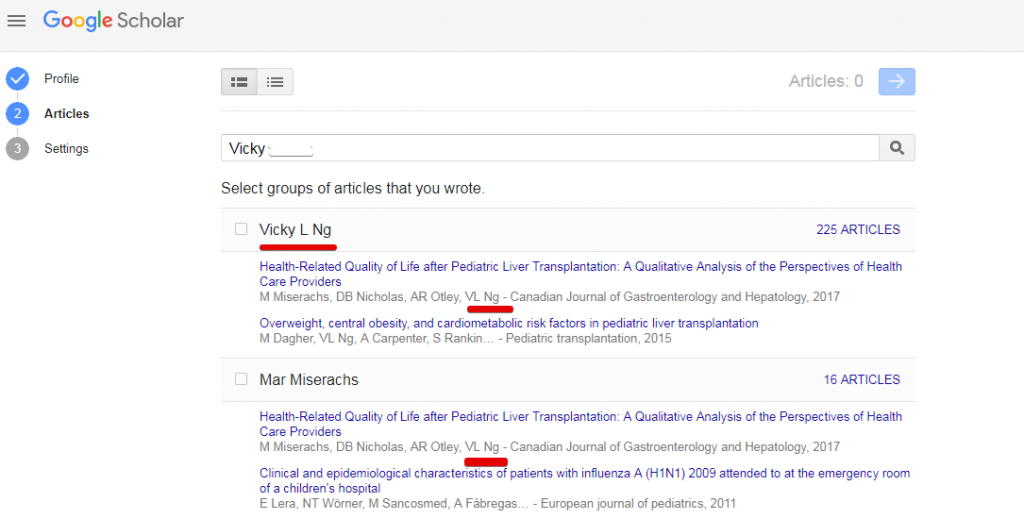 Select the articles that really belong to you and must be attributed to you. The list of these articles might be multiple pages long. So, make sure you scan through all of them.
 - Click the “Next” arrow.
- On the next screen, you can update preferences for verification of citations to your article. You can set this up to ensure Scholar asks you to approve every new citation or pre-approve all citations without having to consult you.

- If you select “Make my profile public”, other researchers will be able to view your profile by clicking on your name in search results (when they search for articles attributed to you).
- Click “Done”.
Once your profile is set up, you will see the profile page which looks something like this:
Once profile setup is complete, Google sends a verification mail to your university email address you entered in Step 3. You have to click the verification link in this email. Once verified, your email will be visible on this profile.
By default, your Google Scholar profile is not public. Other researchers can see your work attributed to you in their search results, but they cannot click your name to view your profile. Having a public profile on Scholar is an indication of credibility.
Before you make your profile public you may want to give some finishing touches such as verify if all the articles in the list are correctly attributed to you and add a professional photo of yours.
To make your profile public,
- Log on to scholar.google.com
- Open your profile by clicking “My Profile” at the top-left corner.
- Click the “Follow” button.
- Click the “Make it public” button in the resulting dialog box.
Improving overall search apart from the use of Google Scholar
While Google Scholar is a fantastic research tool, it also requires you to have a fair bit of domain expertise to make the best use of it. For new researchers, coming up with the vocabulary/keywords related to specifics in your field might be difficult.
If you have a similar problem while working with Google Scholar, you can use secondary research tools like Wikipedia to discover new search terms. Every Wikipedia article has references; you can use them as a supplement to make your Scholar search even more effective.
Another important tip to note: Typically, researchers cite more generic studies in references to their publications. Use the “References” section of any publication for which you want to see more general studies.
Lastly, if you are not getting the kind of studies you are looking for on Scholar, scroll to the bottom of the Scholar search result page. You will see two columns of related search keywords. They’re placed there specifically to help you narrow down your search process.
 How to use Google Scholar for Legal Research
When doing background research for the law, having access to a world-class database is crucial. Two such databases are JSTOR and HeinOnline. However, these are paid tools and not meant for student researchers or low-budget researchers.
While JSTOR mentions their rates outright on their pricing page, HeinOnline specifically requires you to send them a detailed email stating your purpose just to get a quote from them. Fortunately, Google Scholar provides a backdoor to JSTOR, HeinOnline, and similar databases. It thus becomes an effective way to control your search costs.
To search for case law on Google Scholar released by District or Federal courts in the US,
- Go to the Google Scholar homepage.
- Check the “Case law” option just below the search box. You will see more options for different courts. You can select the target court to search its documents here or you can refine it during the search.

- Enter the search term in the text box and press Enter key.
- As you see the search results, you will see the same court selection options in the left sidebar.

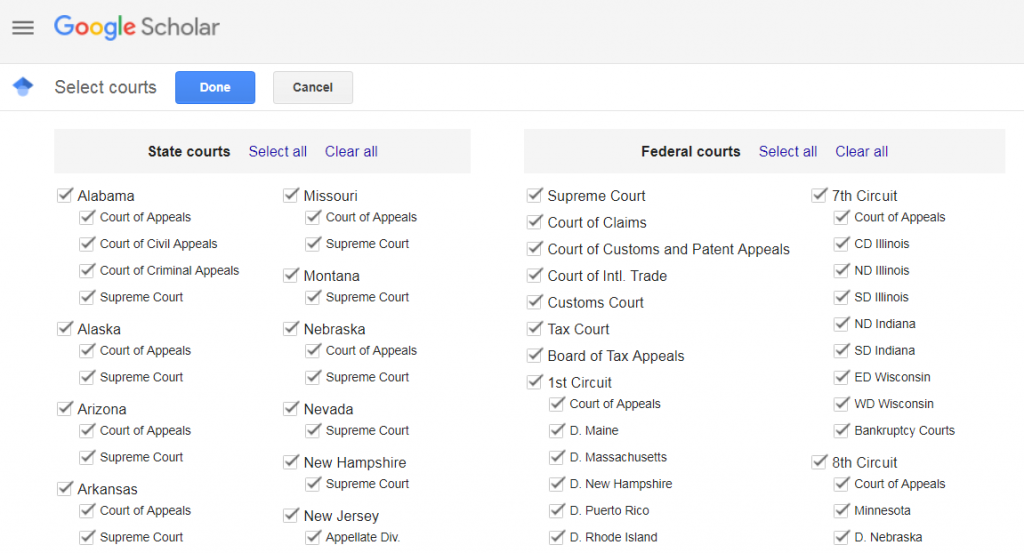
When you click “Select Courts”, you will see the whole structure of courts in the US, including state supreme courts, and federal courts. Select one or more your target courts to narrow down your search.
Without Google Scholar, you have to rely on manual options such as scouring and scavenging for physical copies of court verdicts and other related documents. Often when you are reading court verdicts, they refer to previous cases as a benchmark for making legal decisions. Finding a referred case is a whole other story, it takes up way too much time for the amount of research output it gives.
Scholar not only links the referred case verdicts from within the text of the verdict, but it also lets you discover cases where a verdict has been cited and how many times it has been cited. This is one of the most effective tools for legal research.
Limitations of Google Scholar
As comprehensive as Google Scholar is as a research tool, it still has a few chinks in its armor. First, it doesn’t cover every academic publication source. Second, it doesn’t have any way to check if an article is peer-reviewed. You may miss out on critical research, so you should not rely only on Scholar for your academic and legal research.
Google Scholar also doesn’t have an option to filter out articles that have not been peer-reviewed or don’t have the full text available. But then, almost every good thing comes with its own set of cons. In the case of Scholar, the pros far outweigh the cons.
Conclusion
Google Scholar is undoubtedly one of the most powerful research tools for anyone interested in scholarly/academic research. It provides a vast set of options to widen or narrow your search directions. You can also search for articles that have cited a particular publication. You can save articles into your personal library and read it from any device. Not just that, you can set up your Google Scholar profile and it will automatically track all the works published in your name.
For all its positives, Google Scholar still doesn’t allow you to restrict its searches to only those documents whose full-text version is available. There is no way to determine if an article you found on Google Scholar has been peer-reviewed or quality-checked.
Nonetheless, Google Scholar is an amazingly robust and well-designed tool. Google doesn’t make any compromises for any software product it develops and it’s obvious that the same level of work has gone on into developing Google Scholar.
Google Scholar: One of the best free legal research tools you could and you should get your hands on.
What’s Next?
Next on our list comes the Google Patents. Quite similar to Google Scholar, Google Patents is a Patent search engine with really impressive features and user interface.
We created a similar in-depth guide for Google Patents a while ago by keeping both professional and emerging patent practitioners in mind. We have tried to cover almost everything about using Google Patents in your patent searches along with some tips and tweaks to make entire searches more powerful. Click here to become a power user of Google Patents.


